Introduction to Cinematic Color Grading
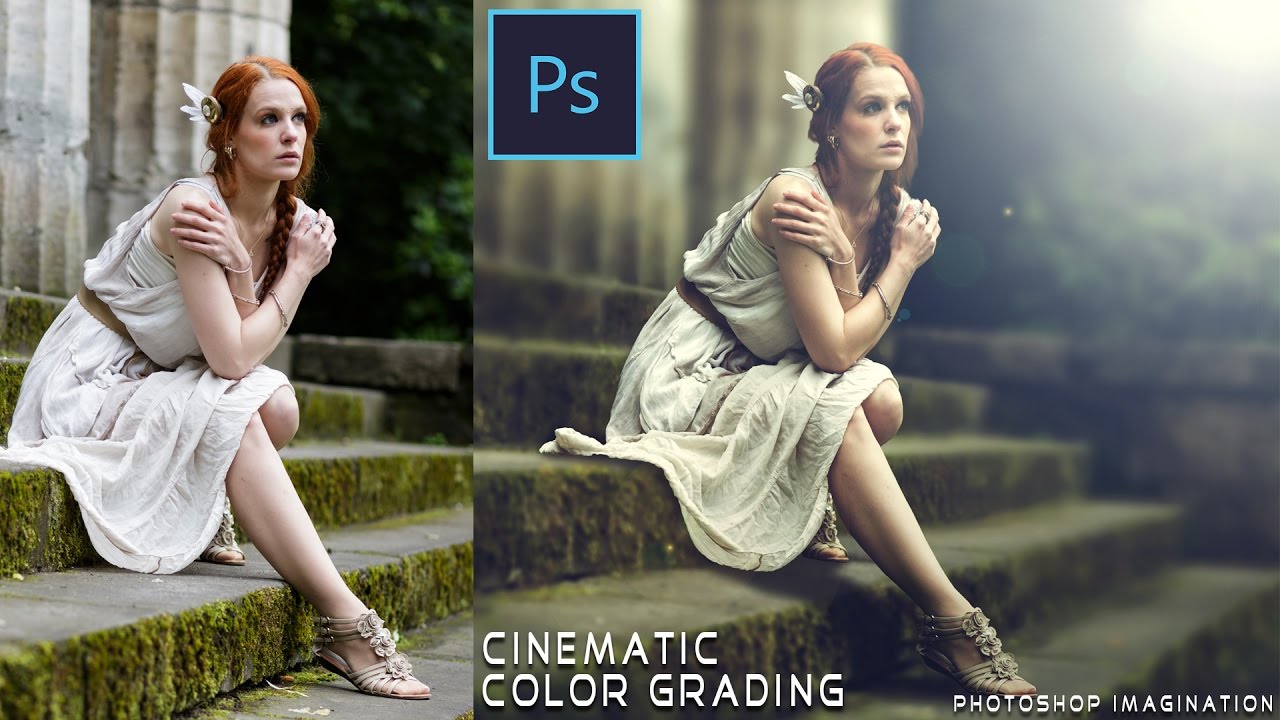
Cinematic color grading is an essential technique used to enhance the visual aesthetic of images, making them resemble the dramatic tones seen in films. Whether for a photography project or digital artwork, color grading brings a professional, polished look that transforms an ordinary image into something more dynamic and visually engaging. Photoshop offers powerful tools for adjusting colors, contrasts, and tones, enabling you to create beautiful cinematic effects.
This guide will walk you through the key steps to achieve cinematic color grading in Photoshop, explaining the importance of tools like adjustment layers, color lookup tables, and blending modes, which will help you recreate iconic cinematic styles.
Understanding the Concept of Cinematic Color
Cinematic color refers to the distinctive color schemes commonly used in films to convey mood, tone, and emotion. These color grades often emphasize warm and cool contrasts, deep shadows, and rich, vivid hues. For example, the iconic teal and orange color palette is frequently seen in blockbuster films to create a balanced contrast between skin tones and backgrounds.
Cinematic color is not just about beauty but also storytelling—guiding viewers’ emotional responses through intentional color choices. Understanding this concept is crucial as it influences how you approach color grading in Photoshop, ensuring that the final image reflects the intended mood and style.
Preparation Before Color Grading in Photoshop
Before jumping into the color grading process, it’s essential to prepare properly. Here’s what you need to do:
- Choose the Right Photo: Ensure that your image has a clear focal point and good lighting. High-quality, high-resolution photos will produce the best results.
- Set Up Your Workspace: Organize your panels and tools in Photoshop for efficient editing.
- Work with RAW Files: Using RAW files provides more flexibility in adjustments since they contain more color information compared to JPEG images.
By preparing correctly, you can make the color grading process smoother and more effective.
Essential Tools for Color Grading in Photoshop
Photoshop is equipped with a variety of tools that allow precise control over colors and tones. The most important ones for cinematic color grading include:
- Adjustment Layers: Curves, Levels, and Color Balance adjustments are foundational for controlling exposure, contrast, and color shifts.
- Color Lookup Tables (LUTs): These are pre-designed filters that apply complex color changes to your image.
- Gradient Map: This tool helps apply custom color tones to highlights and shadows, creating depth and drama.
- Selective Color: Offers control over specific color ranges, allowing for targeted adjustments to skin tones, skies, and other elements.
Mastering these tools is key to creating a professional-grade cinematic effect.
Step-by-Step Guide to Creating Cinematic Color Grading
Let’s walk through the detailed steps to create cinematic color grading in Photoshop:
- Open Your Image: Begin by opening your chosen photo in Photoshop.
- Basic Exposure Adjustments: Use Levels or Curves to adjust the exposure, bringing out details in both shadows and highlights.
- Curves Adjustment for Contrast: Curves allow you to add deep contrast, essential for creating the cinematic look. Focus on making blacks darker and highlights brighter.
- Color Balance for Mood: Adjust the color balance to bring a warm or cool tint depending on the mood you’re going for.
- Apply LUTs: Use Color Lookup Tables (LUTs) to quickly apply a cinematic filter to your image.
- Refining Colors with Selective Color and Hue/Saturation: Fine-tune the individual color ranges to ensure the overall tone is balanced.
- Add Gradient Maps: Apply Gradient Maps to create a stylized look by mapping highlights and shadows to specific colors.
- Final Touch: Vignette Effect: Create a vignette to draw attention to the subject and enhance the cinematic effect.
Following these steps will help you achieve a consistent, professional look.
Using Color Lookup Tables (LUTs) in Photoshop
LUTs (Color Lookup Tables) are an excellent tool for quickly applying a cinematic grade to your photos. They work by remapping the colors in your image according to predefined settings, creating a dramatic look in a few clicks.
- Applying LUTs: You can find LUTs under the “Color Lookup” adjustment layer in Photoshop. Simply select a preset that aligns with the style you want.
- Customizing LUTs: You can combine multiple LUTs or adjust their opacity to fine-tune the effect.
LUTs are incredibly powerful and can save you time when you want to replicate a particular cinematic style.
Creating a Cinematic Contrast in Your Image
Contrast is one of the key elements of cinematic color grading. High contrast enhances the mood and helps focus attention on the subject. Using Photoshop’s Curves adjustment, you can easily deepen shadows and brighten highlights to create the strong contrasts characteristic of cinematic photography.
Creating Cinematic Color Palettes
Color palettes like teal and orange are synonymous with cinematic grading. These palettes highlight skin tones while providing a contrasting cool background. Here’s how you can apply a custom color palette to your image:
- Use the Selective Color tool to emphasize key colors.
- Combine with Gradient Maps for an additional layer of stylization.
Experimenting with different palettes allows you to create unique cinematic looks.
Matching Color Grading Across Multiple Photos
Maintaining a consistent color grade across multiple images is crucial when working on a series of photos. You can achieve this by:
- Saving Adjustment Layers as Presets: Photoshop allows you to save your adjustments and apply them to other photos.
- Using Actions: Record your color grading process and apply it automatically across a batch of images to ensure uniformity.
Applying Cinematic Toning Using Gradient Maps
Gradient Maps allow you to apply custom tones to your highlights and shadows. Here’s how to use them:
- Create a new Gradient Map adjustment layer.
- Choose a color gradient that reflects the cinematic tone you want.
- Experiment with blending modes to achieve subtle effects.
Gradient Maps are a powerful way to infuse your images with cinematic style.
Creating a Cinematic Vignette Effect
A vignette helps to focus attention on the subject of your image by darkening the edges. To create a vignette in Photoshop:
- Use the Elliptical Marquee Tool to create a selection around your subject.
- Apply a feathering effect to soften the edges.
- Use the Curves or Levels adjustment to darken the outer areas.
This simple technique adds depth and drama to your photo.
Using Blending Modes for Cinematic Effects
Photoshop’s blending modes can help you layer adjustments for more dramatic cinematic effects. Experiment with modes like Soft Light and Overlay to increase contrast and intensity.
Fine-Tuning Skin Tones in Cinematic Color Grading
Maintaining natural skin tones is essential, even in dramatic color grades. Use the Selective Color tool to adjust skin tones without affecting the overall image.
Saving and Exporting Your Cinematic Color Grade
Once you’ve achieved the desired look, save your work in formats that preserve the color grade. Export options like TIFF or high-quality JPEG ensure your image maintains its cinematic appeal across different platforms.
Common Mistakes to Avoid in Cinematic Color Grading
- Over-Saturation: Avoid pushing colors too far, which can result in unnatural looks.
- Inconsistency: Ensure uniform grading across multiple images for a cohesive series.
- Neglecting Skin Tones: Over-corrected skin tones can make portraits look unnatural.
Conclusion: Achieving a Professional Cinematic Look
Creating cinematic color grading in Photoshop requires a blend of creativity and technical skill. By following the steps outlined above and practicing with different tools and styles, you’ll be able to transform your photos into cinematic masterpieces.
Frequently Asked Questions (FAQs)
- What are Color Lookup Tables (LUTs) and how do they work in Photoshop? LUTs are presets that apply specific color and tonal changes to your image. They work by remapping the original colors according to a predefined table, giving you cinematic results in seconds.
- Can I achieve a cinematic color grade without LUTs in Photoshop? Yes, using adjustment layers like Curves, Color Balance, and Selective Color can achieve similar effects manually, allowing for more customization.
- What is the best color palette for a cinematic look? The teal and orange palette is popular due to its complementary contrast between warm skin tones and cooler backgrounds, but experimenting with other palettes can yield unique results.
- How can I maintain consistent color grading across multiple images? Save your adjustment layers as Photoshop presets or use actions to apply the same grading settings across multiple images.
- What should I do if my color grading looks unnatural or overdone? Reduce the opacity of your adjustment layers, revisit your color choices, and ensure skin tones are natural for a more balanced result.