Opening Adobe Premiere Pro for the first time can feel overwhelming. The screen is filled with different panels, buttons, and tools, making it difficult to know where to begin. Many beginners spend more time trying to understand the interface than actually editing videos.
The good news is that you don’t need to learn every feature on day one. Once you understand the purpose of the main panels and how they work together, editing becomes much easier.
In this guide, we’ll walk through the Adobe Premiere Pro interface and explain each section in simple terms so you can start editing with confidence.
Why Understanding the Interface Matters
Before you begin cutting clips or adding effects, it’s important to know where everything is.
Understanding the workspace helps you:
- Edit videos more efficiently
- Find tools quickly
- Stay organized during projects
- Build confidence as you learn new editing techniques
Think of the Premiere Pro interface as your editing desk. Every panel has a specific purpose, and once you know what each one does, everything starts to make sense.
The Welcome Screen
When you launch Adobe Premiere Pro, you’ll first see the Welcome Screen.
From here, you can:
- Create a new project
- Open an existing project
- View recent projects
- Access learning resources
For beginners, simply click New Project to start editing.
The Main Workspace
After creating a project, you’ll enter the editing workspace.
Although it may look busy at first, most beginners only need to focus on a handful of panels.
The default layout is designed to keep everything within easy reach while editing.
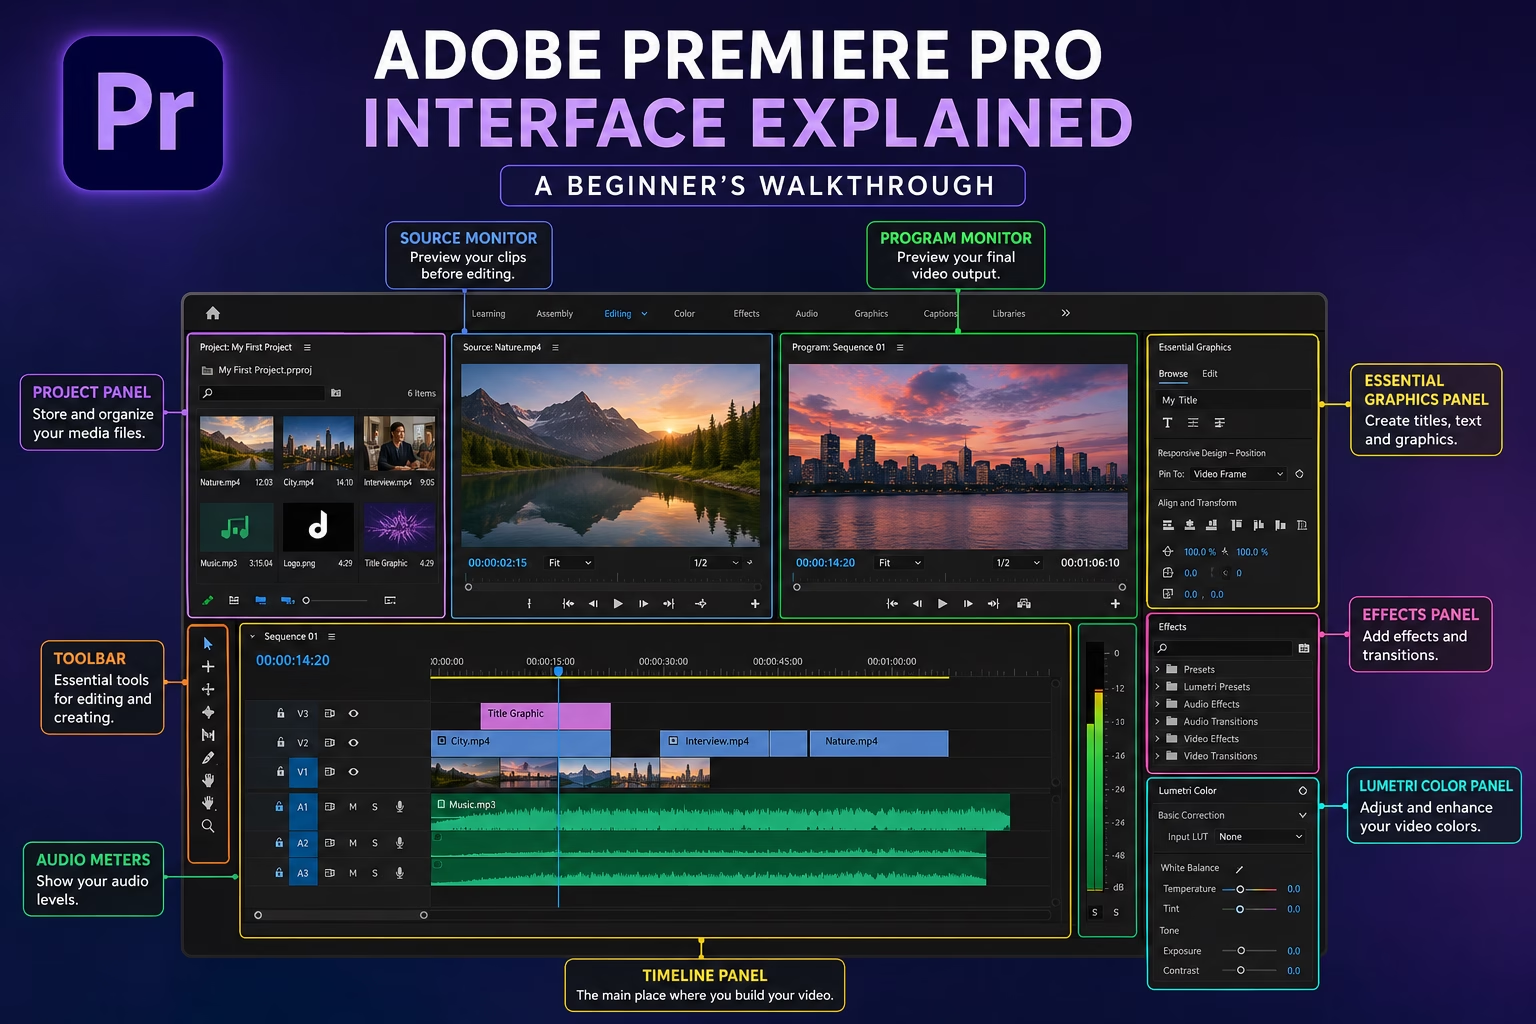
Project Panel
The Project Panel is where all of your media files are stored.
Every video, image, audio file, or graphic you import appears here.
Think of this panel as your project’s library.
A good habit is to create folders (called Bins) for different types of files, such as:
- Videos
- Audio
- Images
- Logos
- Music
Keeping everything organized will save you time as your projects grow.
Source Monitor
The Source Monitor allows you to preview a clip before adding it to your timeline.
Here you can:
- Watch your footage
- Select the exact part you want to use
- Set starting and ending points
- Preview clips without affecting your project
Many professional editors review their footage here before placing it on the timeline.
Timeline Panel
The Timeline is the heart of Premiere Pro.
This is where your video is actually created.
You’ll arrange clips, trim unwanted sections, add transitions, music, titles, and effects.
The timeline contains two different types of tracks:
Video Tracks hold your video clips, images, and graphics.
Audio Tracks contain voice recordings, music, and sound effects.
Most of your editing time will be spent in this panel.
Program Monitor
The Program Monitor displays your finished edit.
Unlike the Source Monitor, this panel shows exactly what your audience will see.
As you make changes in the timeline, the Program Monitor updates instantly.
Use it to preview your video before exporting.
Toolbar
Between the Timeline and Project Panel, you’ll find the Toolbar.
These are the tools you’ll use while editing.
Some of the most important ones include:
Selection Tool (V)
Used to select and move clips.
Razor Tool (C)
Cuts clips into separate pieces.
Hand Tool (H)
Moves around the timeline.
Type Tool (T)
Creates titles and text.
As a beginner, you’ll mainly use the Selection Tool and Razor Tool.
Audio Meters
The Audio Meters display the volume levels of your project while it plays.
If the audio reaches the red area too often, it may sound distorted.
Keeping your audio levels balanced helps your videos sound professional.
Effects Panel
The Effects Panel contains all the visual and audio effects available in Premiere Pro.
You’ll find:
- Video transitions
- Audio transitions
- Blur effects
- Color effects
- Distortion effects
- Presets
As a beginner, it’s best to start with simple transitions like Cross Dissolve and basic fade effects.
Essential Graphics Panel
The Essential Graphics Panel makes it easy to create text and titles.
You can add:
- Video titles
- Lower thirds
- Captions
- Simple motion graphics
Clean, readable text often looks more professional than using too many animations.
Lumetri Color Panel
Color correction helps improve the overall look of your footage.
The Lumetri Color Panel lets you adjust:
- Exposure
- Contrast
- White Balance
- Saturation
- Highlights
- Shadows
For beginners, simple brightness and contrast adjustments are often enough to make footage look more polished.
Workspaces
Premiere Pro includes several built-in workspaces designed for different editing tasks.
Some common workspaces include:
- Editing
- Color
- Audio
- Graphics
- Effects
- Assembly
You can switch between them depending on what you’re working on.
Most beginners will spend most of their time in the Editing workspace.
Customizing Your Workspace
One of Premiere Pro’s best features is that you can customize your workspace.
You can:
- Resize panels
- Move panels
- Close unused windows
- Save your own workspace layout
As you become more experienced, creating a personalized workspace can speed up your editing process.
Useful Keyboard Shortcuts
Learning a few keyboard shortcuts can save a lot of time.
Some useful shortcuts include:
| Shortcut | Function |
|---|---|
| V | Selection Tool |
| C | Razor Tool |
| Spacebar | Play or Pause |
| Ctrl + S | Save Project |
| Ctrl + Z | Undo |
| + / – | Zoom Timeline |
| Delete | Remove Selected Clip |
You don’t need to memorize them all at once. Start with two or three and gradually learn more.
Tips for Beginners
If you’re just getting started with Premiere Pro, keep these tips in mind:
- Don’t try to learn every feature at once.
- Keep your media files organized.
- Save your project frequently.
- Practice with short videos before working on larger projects.
- Focus on clean cuts before adding fancy effects.
The more you edit, the more comfortable the interface will become.
Final Thoughts
Adobe Premiere Pro may look intimidating at first, but once you understand the main panels, editing becomes much more enjoyable.
Start by learning the Project Panel, Timeline, Program Monitor, and Toolbar. These four areas are where you’ll spend most of your time creating videos.
As your skills improve, you’ll naturally begin exploring advanced features like color grading, motion graphics, and visual effects.
Remember, every professional video editor started as a beginner. Take your time, keep practicing, and soon the Premiere Pro interface will feel familiar.
Read More: How to Optimize Illustrator for Better Performance